PHOTOSHOP MAGIC ETC
@ExplosiveControlArt
Photoshop is not only a way to create or enhance art, but can be quite sneaky in correcting photos, when an App or push of a button or Ai just can’t do it!
Common corrections can be removing blemishes, stains, etc, but I tend to take it to the next level.
In large group photos for example, where we had many photos to choose from, yet not one photo had everyone smiling or looking great at the same time. I’ve been known to perform “head transplants” where I’ll switch out person’s head from another photo of them, to have one group photo where everyone looks great, and no one is the wiser (artist patient confidentiality)
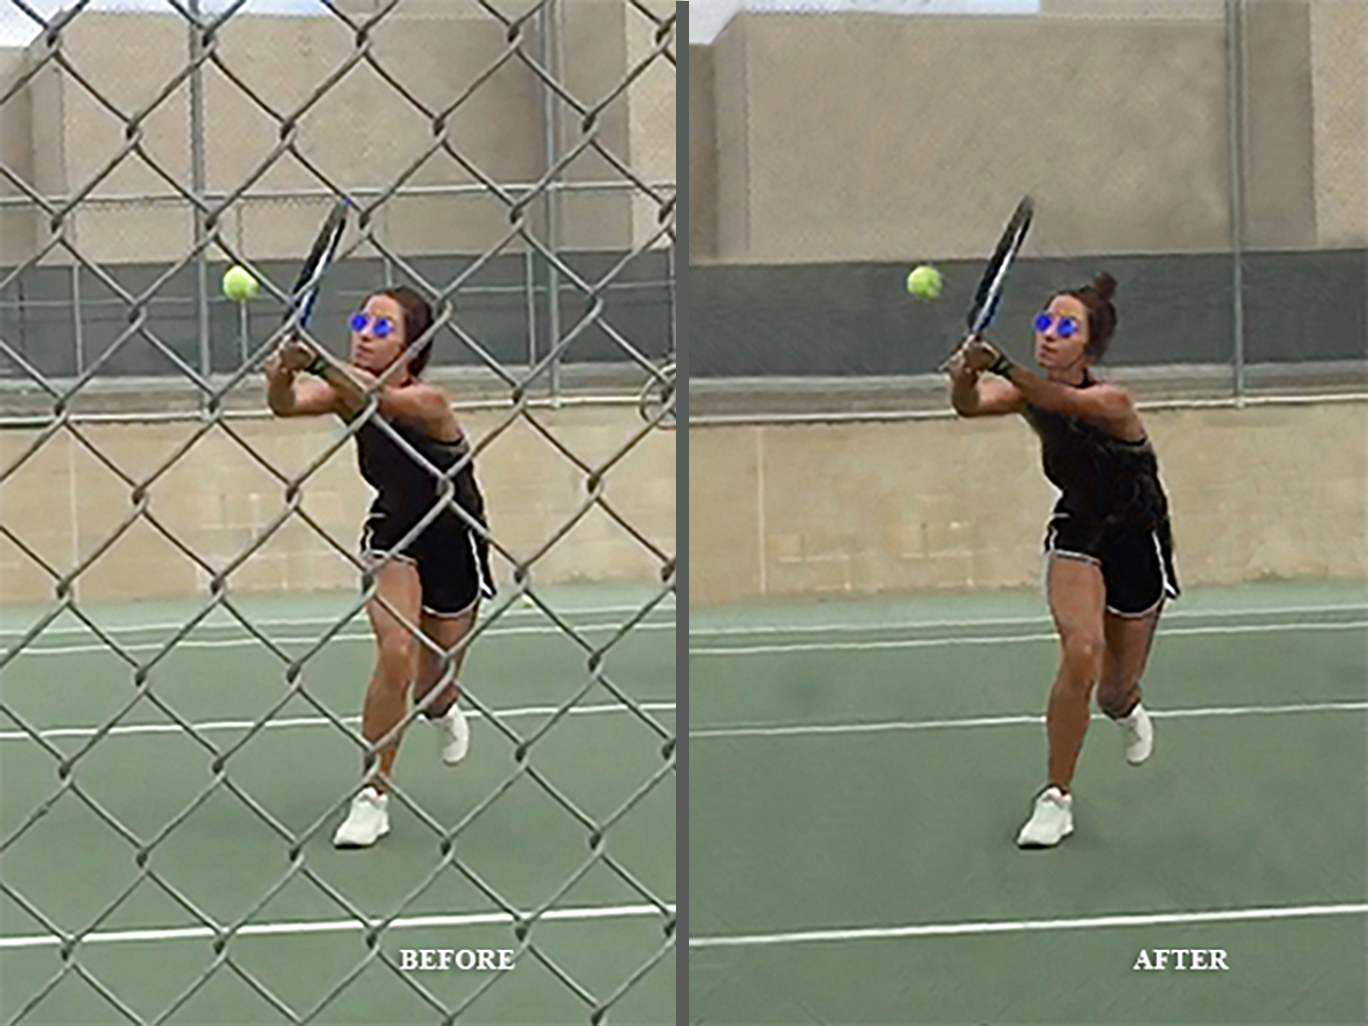
To “clean-up” a photo, if I want one image to stand out, but behind the image is a cluttered background, I’ll remove the clutter.
Newer quick fixes and tools to remove extra people in photoshop or Iphones can be useful, but they can only work if there is a simple background.
With an attention to detail, the artist eye, and mad photoshop skills, posting a bad photo is not an option.
A little dragon slaying. . . You can see in my Stationery portfolio some of the creative cards I made using photoshop, here’s one example where I posed us in our house, then put us on a dragon for a very unusual holiday card!
Adding a person from one photo into another! Before our guests arrived to a holiday/anniversary party, my husband took a photo of our daughter and I together, and then I took a photo of my husband and our daughter together. Then later after going through several photos, I saw which ones would work the best. One challenge was my daughter’s arm was on my husbands shoulder in their photo, but was to her side in the photo with me. I had to rebuild the staircase in between them where her arm was . . . It took quite a while, and some more tweaking, and the finished result is all 3 of us in the photo together. (But I wasn’t quite finished with this photo quite yet, as you’ll see further down in “Dr. Frankenstein/photoshop”)
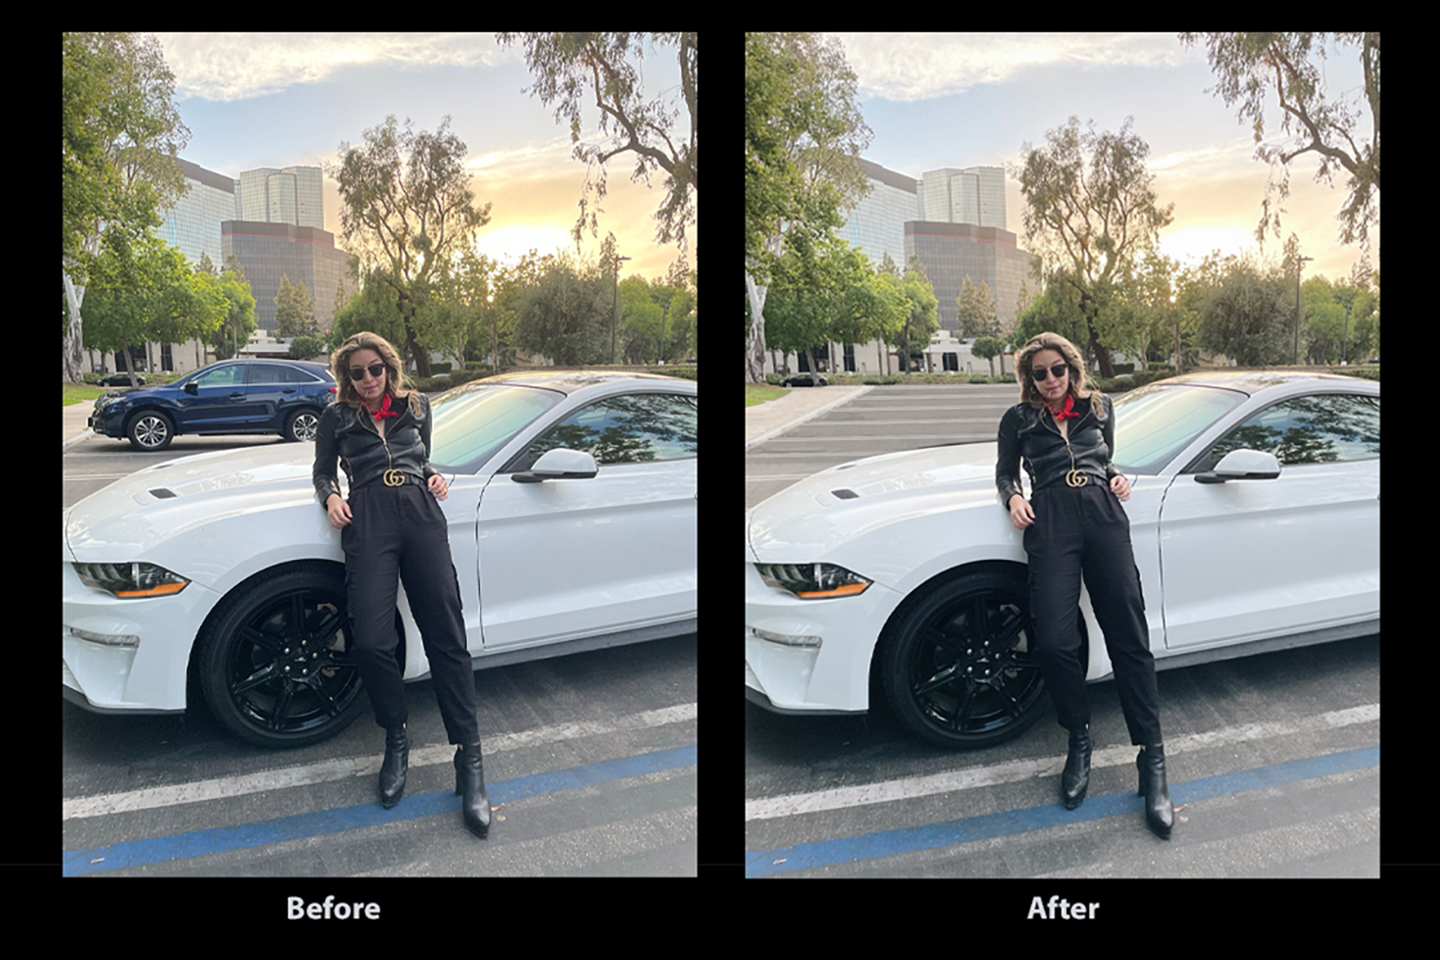
Getting rid of unwanted background object in a photo that an App can’t do! In a photo shoot, my daughter was in front of her Mustang, but there was a large SUV right behind her distracting from the photo. I recreated the parking lot using the few painted stripes from the original pic, by copy and pasting and the clone tool. But the most tedious was rebuilding the buildings behind the car. I used parts of buildings and trees with the clone tool and copy and pasting sections that was not obstructed by the car, so the new background of buildings and trees is different than how the actual buildings are, I did some remodeling without breaking a nail, But no one would notice.
If you’re just erasing an object or person from a simple background there are photoshop tools and apps for that, but when the background behind the object or person is more complex, it takes artistic talent and my mad photoshop skills!
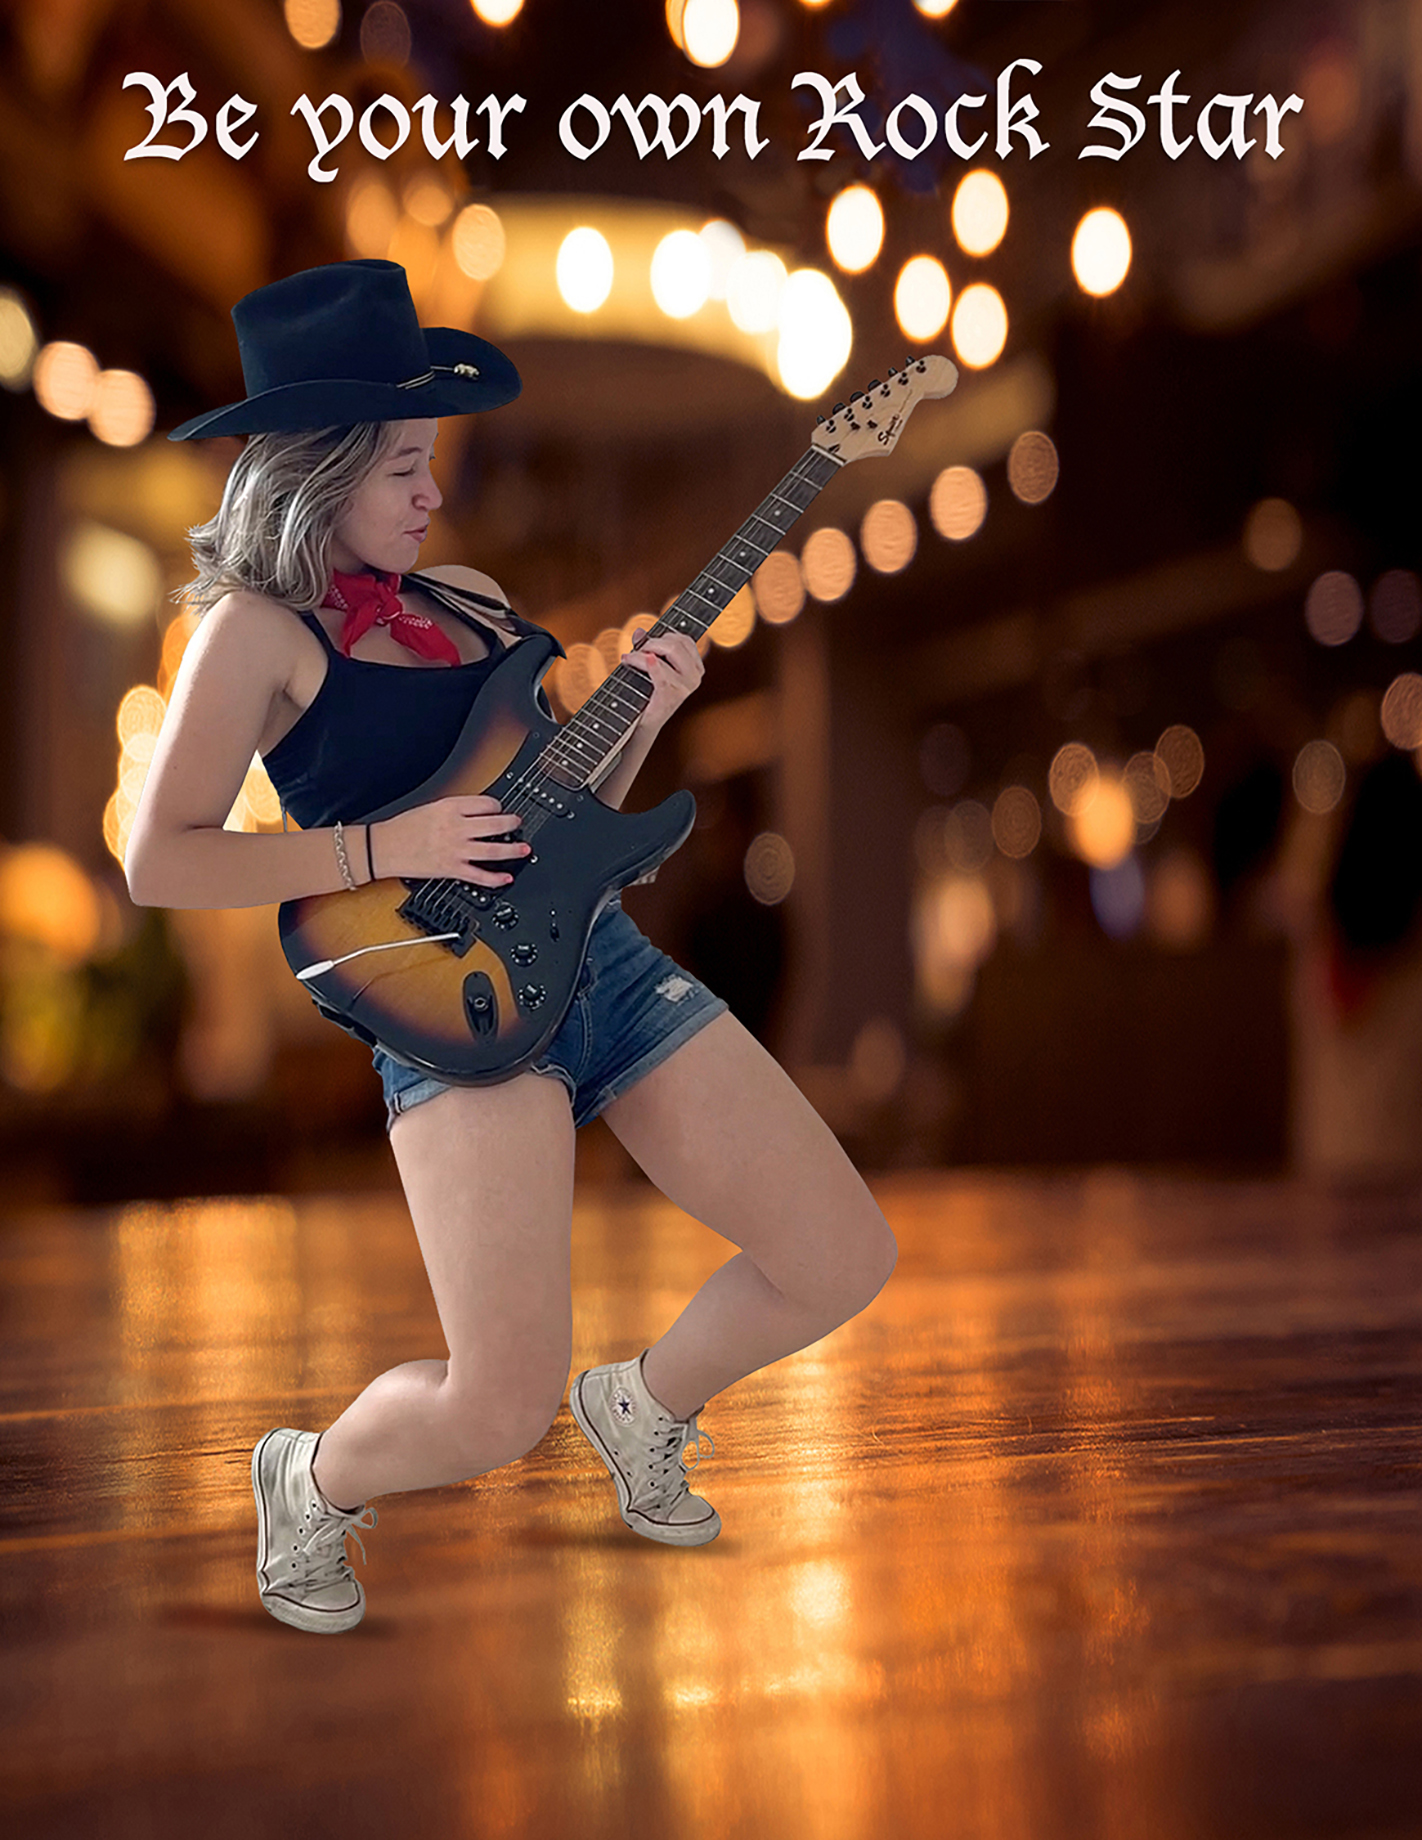
“Be your own Rock Star” Tricks to taking the perfect action photo to later separate and put in a new background, with my daughter Nico as model. I had an image in my head for this photo, but to make it happen, I took short videos of Nico up on her toes and leaning back with her electric guitar, then we looked frame by frame in the short videos, until we saw the perfect moment and took a screen shot. (Otherwise I’d have taken a ton of photos in hopes of getting the perfect shot at the right second, that’s how I used to do it with film, but in this digital age, it’s no longer necessary for a project like this.) Then Nico chose the perfect background for the photo (we’re a great creative team), and the lasso tool was primarily used to separate her from the white wall background that I took the videos from.
In order for her to not look too floaty in the new background, the shadows under her feet made a big difference to look more real. That was done with a gradient tool, using the colors on the floor, then a blur tool, and placing it under her feet.
Since Nico is a talented musician, both on piano and guitar, she can use this photo for any of her social media and promotions!
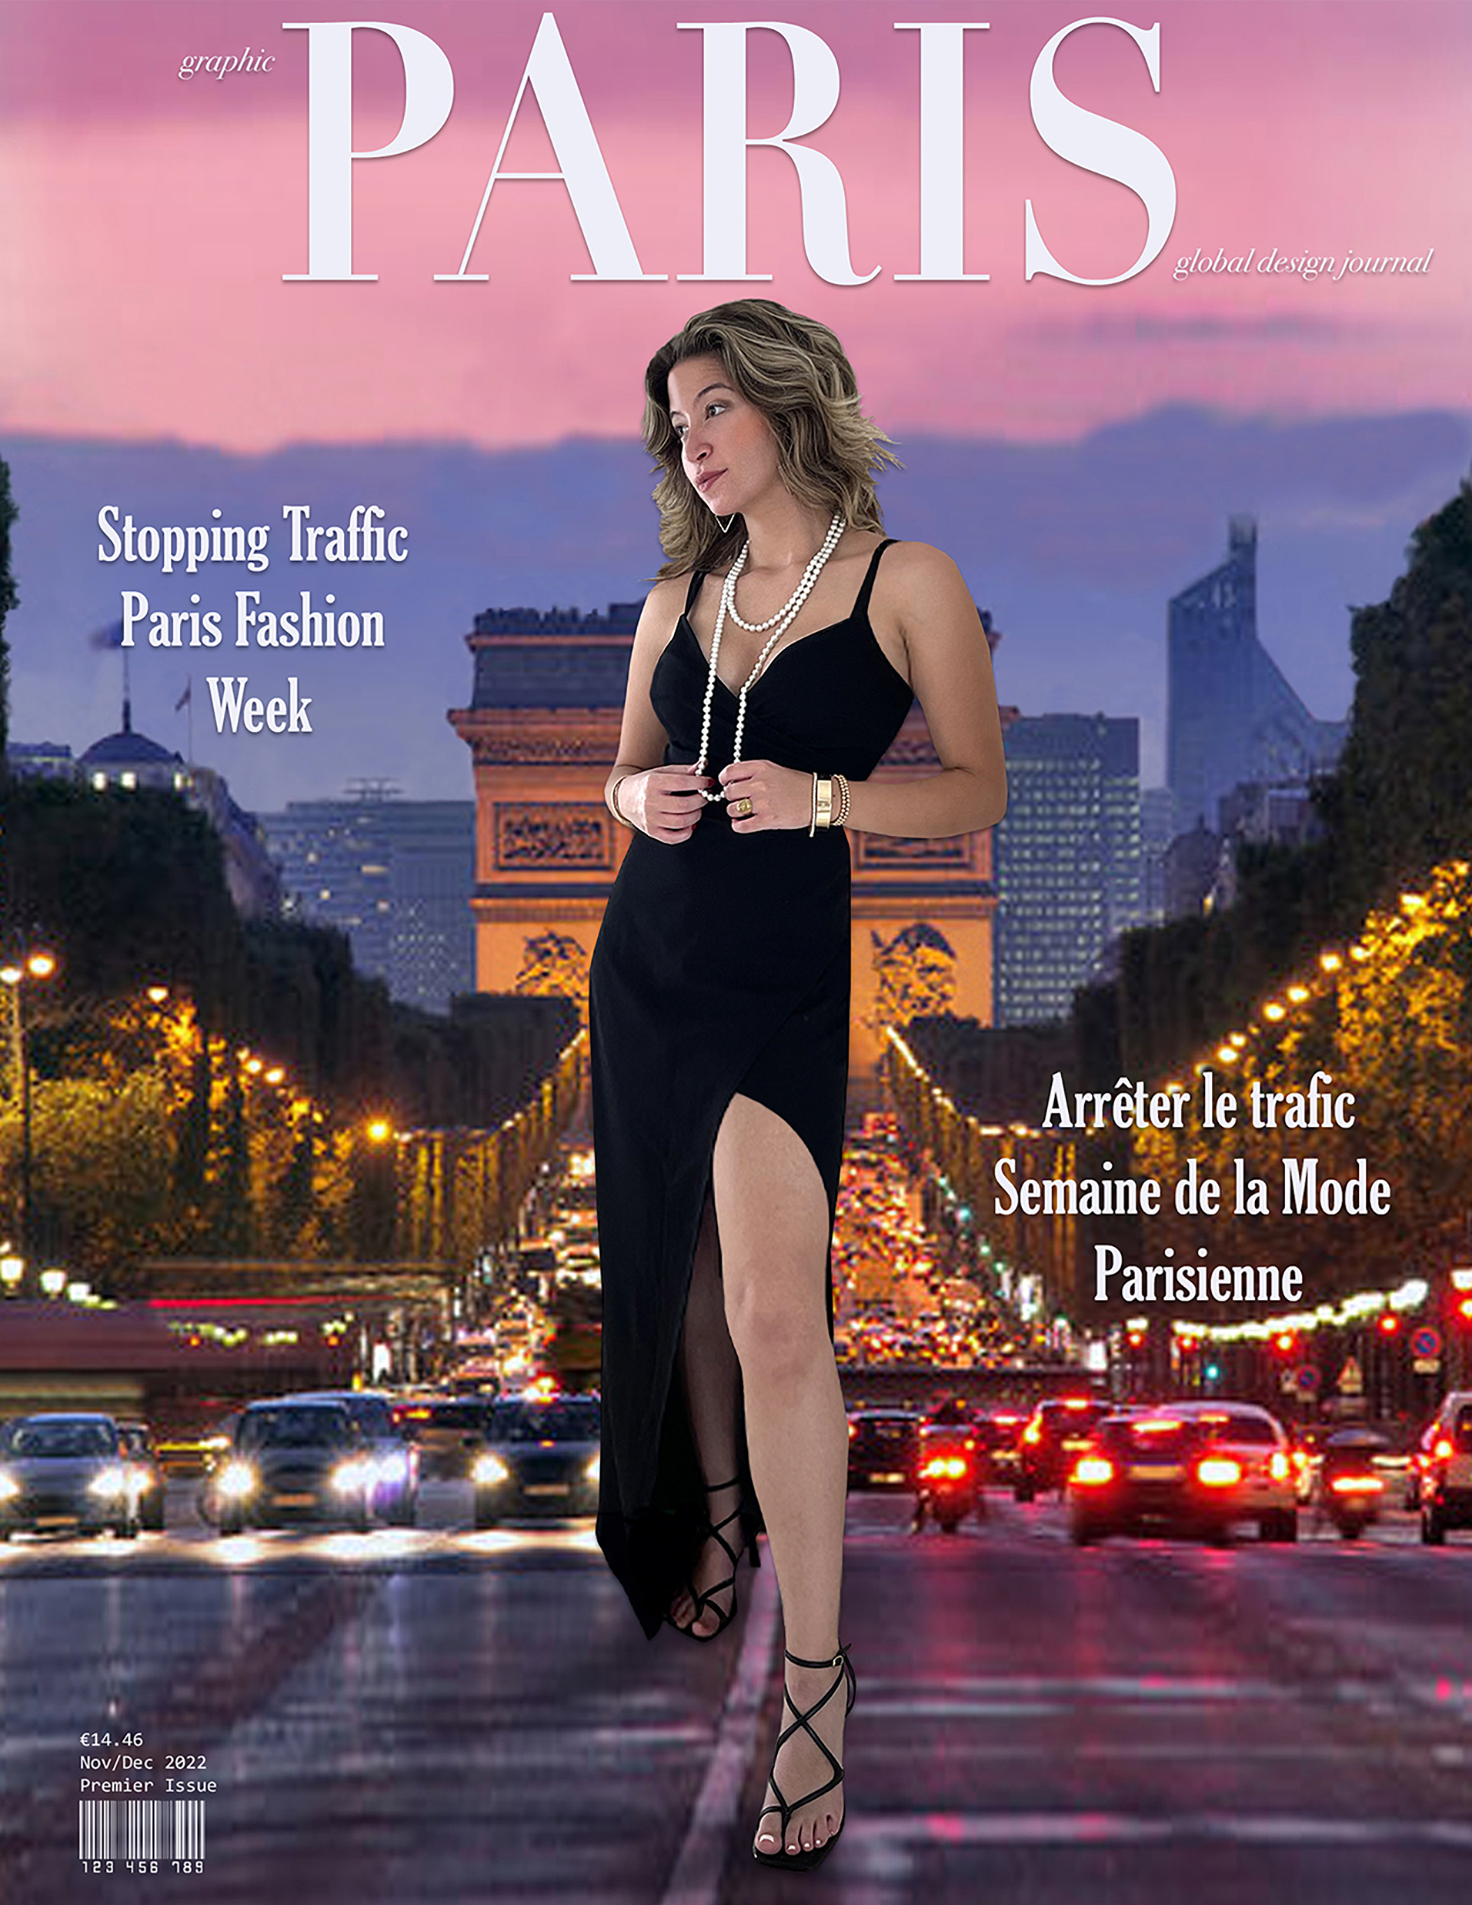
“Stopping Traffic” more photoshop fun project, with my daughter Nico as model again. We had a great concept, then had to make it come to life. I took a photo of her on a white wall, but the fly away hairs are always a challenge when separating your subject from a background. Nico was learning channel masking in photoshop class for hair, something I never took to, and that still needs to be improved, so using lasso tool and clone stamp are another way to deal with hair, and I discovered that cutting and pasting hair sections from the photo (kind of like a hair extensions) can improve areas of hair that border on the new background to make it look more real, you really have to have an artist eye to do that including photoshop skills, but I think one day investing in a green screen would be awesome!
‘New Years Glam Fam‘ Changing clothes the hard way! Another example of putting 3 separate photos taken months apart, together like a surgeon in photoshop! The original photo was with me in burgundy gown and my daughter in a short green dress, shown above in another example, but I wanted to change the photo of my daughter to have her wearing this black gown, and then also add my husband wearing a suit. This was more changes than I usually make, but no problem for the queen of photoshop! I had to recreate sections of the background which is sort of like painting but way more tedious. I had to recreate the background and the furniture that was covered in original photo. I had my daughter stand in our foyer in the black gown with her arm up to be on my husbands shoulder, and used that for her photo. Then the photo of my husband, also taken in the same room, was from another recent evening out that I liked when he was wearing the suit.
It was like a puzzle to see how my daughter and husband fit in the photo next to me to look the most natural, that has to be the priority, then I worked backwards to build the background as needed.
I added the festive holiday ribbons and our karate business logo, to post on our karate website and instagram for a more glam look out of our usual karate gear!
It would be much easier if we were all dressed these outfits in the first place, and used a tripod or had someone else take the photo, but I like a challenge!
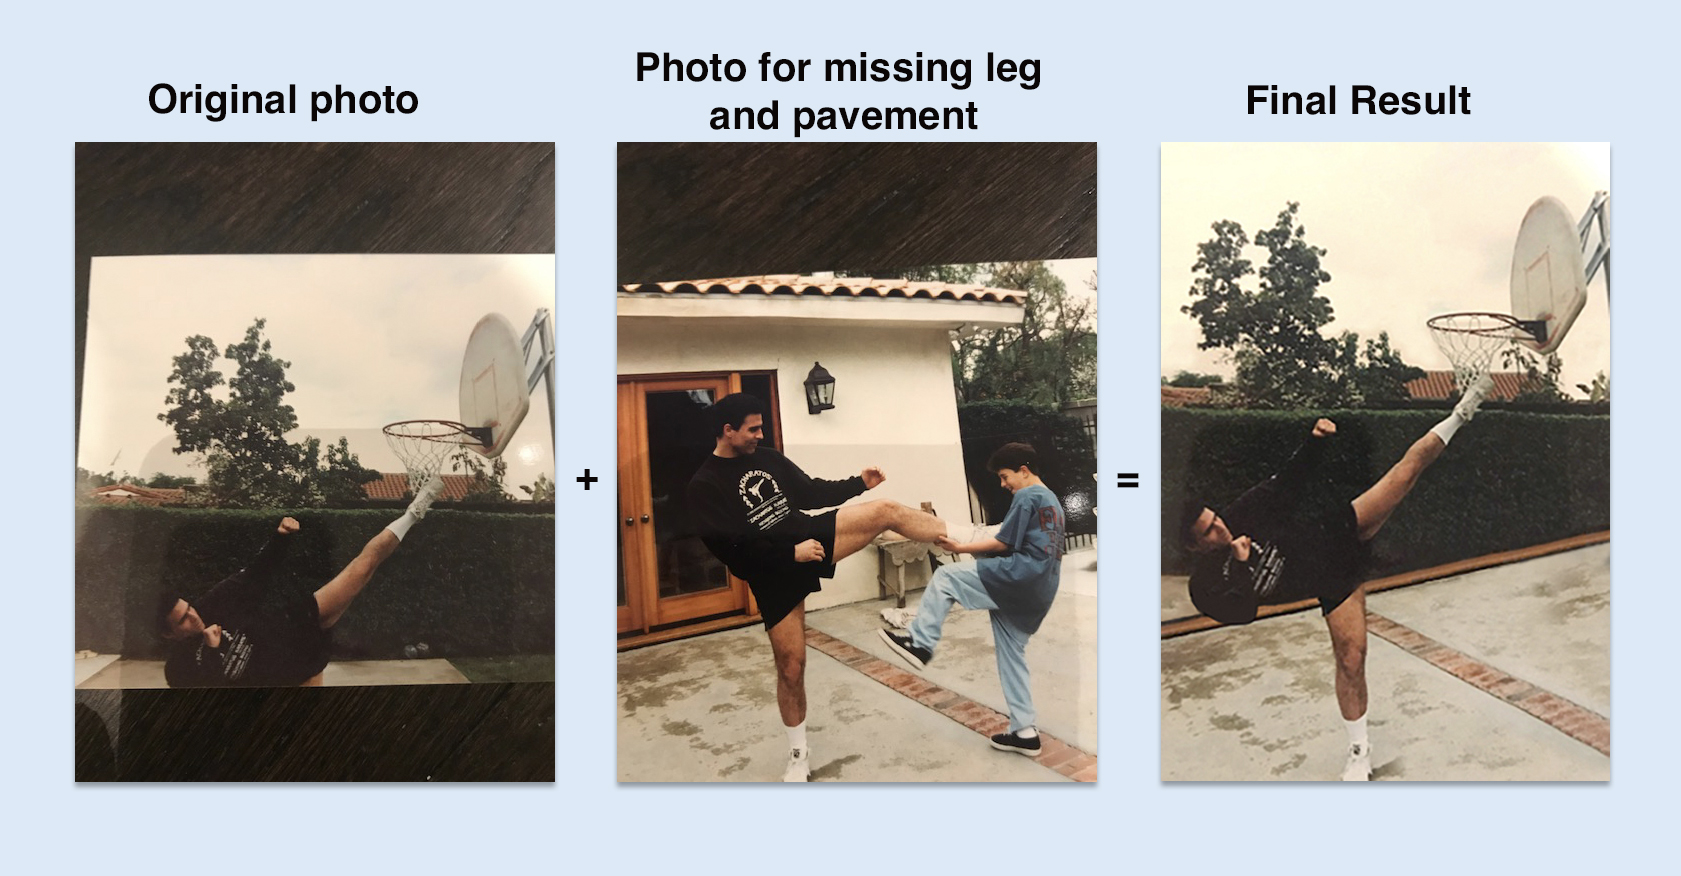
Dr. Frankenstein/photoshop! This is the way an artist can do surgery! In my martial arts business one of our long time kickboxing students sent me two photos, one was a great pic of him doing a high kick reaching the basketball hoop. But it had a serious problem, his leg was missing! And the photo was taken through a window. But luckily he also sent a photo of him doing karate with his son in the same backyard, and there was a perfect leg in the correct position, and also some pavement for the ground that also was not in the original pic. I literally put the missing body parts back by copy and pasting, I had to paint his elbow which was blacked out in original photo. Then it was tedious to rebuild the ground and hedge and brick, but carefully with clone stamp and copy and pasting sections, I was able to reconstruct a realistic photo of how his kick would be if it were taken properly in the first place! I call this photo, “How a Zacharatos Blackbelt plays Basketball!”
Holiday New Years card for 2025-26
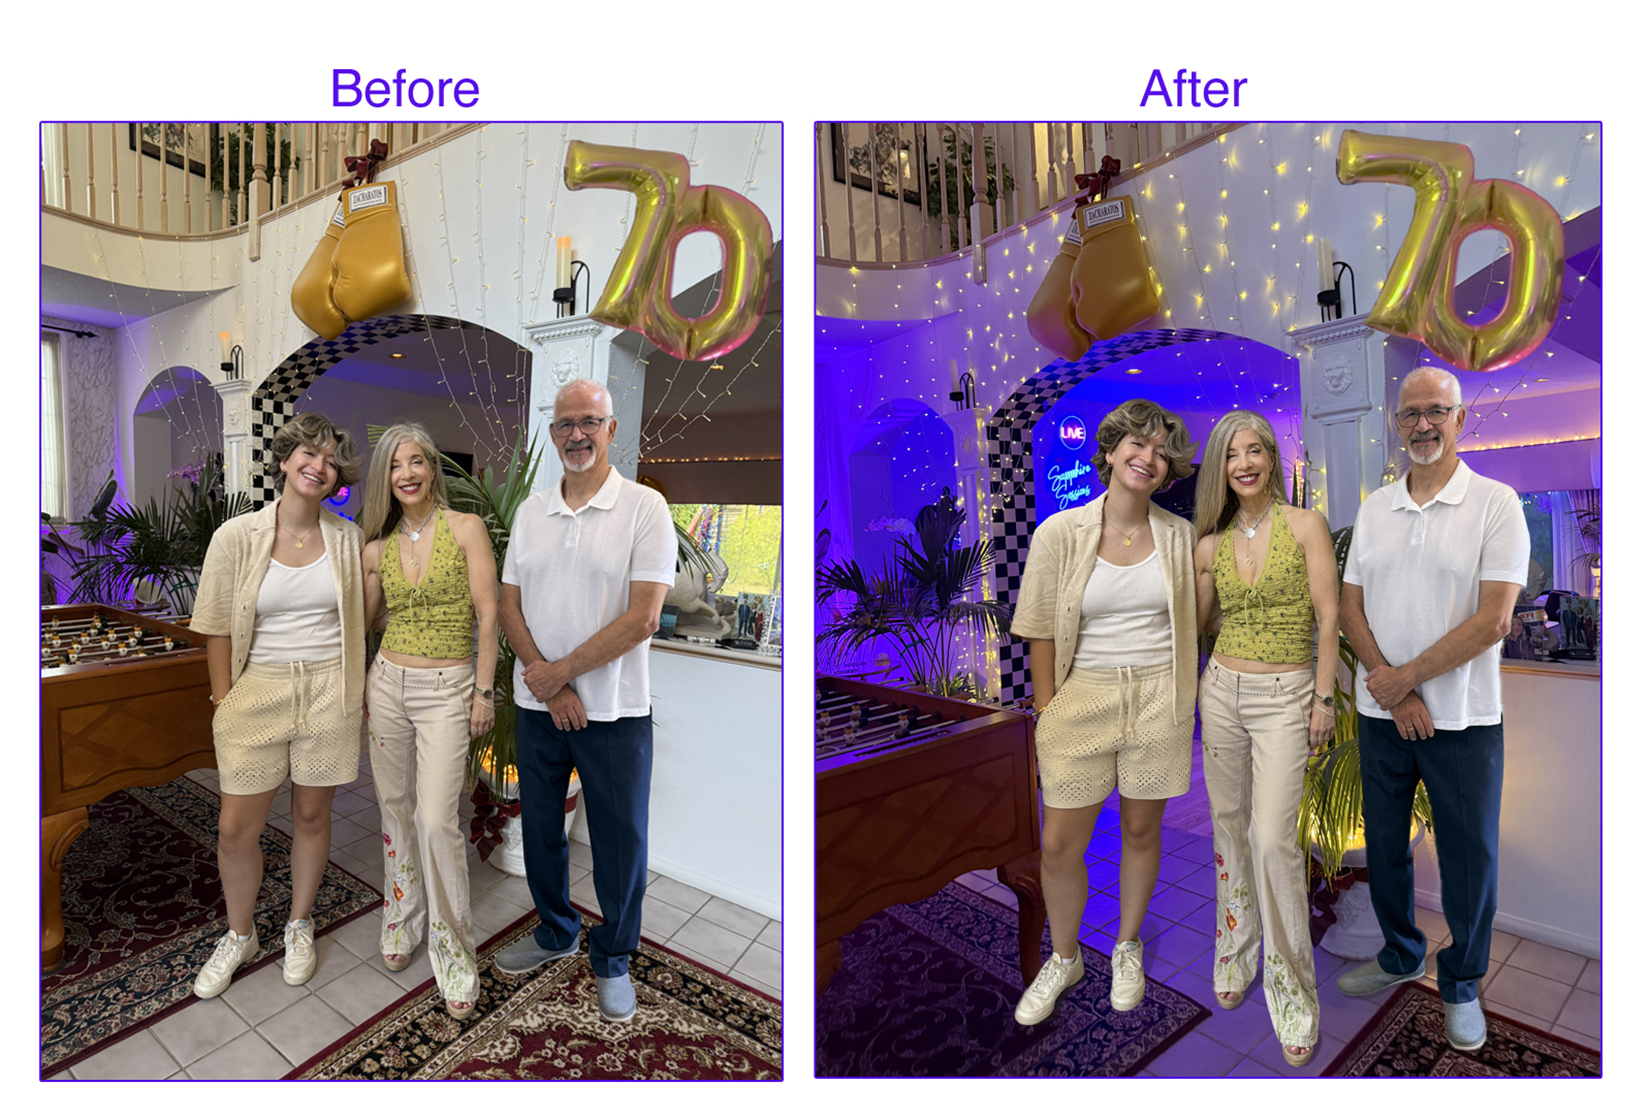
For this year’s annual holiday card, my main photoshopping trick was with our family group cover shot. We had a party for my husbands 70th, but when we took the group photo it was daytime, and I really liked how the lights showed up better at night. First I added my husband to this photo, since he took the photo of me and our daughter, and I took a photo of him separately. Then to put us in the night background, I put on all my party lights, (colored up lights, drapery twinkle lights etc), and took a photo at night of the room at the same angle as the daytime photo. Then I separated ourselves from the daytime photo and put us in the night time background photo. We started to look a little floaty, so I put shadows on our feet and that helped. To separate us from the original photo, the remove background tool for people didn’t work completely, it also took out parts of hair on the head etc, so I could use it for parts of the body which saved time, and what ever parts were missing, I had to separate us the tedious way with the lasso tool, outlining us and deleting the background, and pasting it to the parts that were missing with the remove background tool.
The combination of using the remove background tool and the lasso to separate us from the background, and then adding shadows worked well.
I was happy with the finished product, and mailed over 200 cards to friends, family, business, and our daughter has her mailing list as well. I Calligraphy the address on the envelopes and write something in each card. Many friends say they save all our cards each year, in this digital age, it’s satisfying that my efforts are well worth it!
Sorry AI, somethings still require a human!
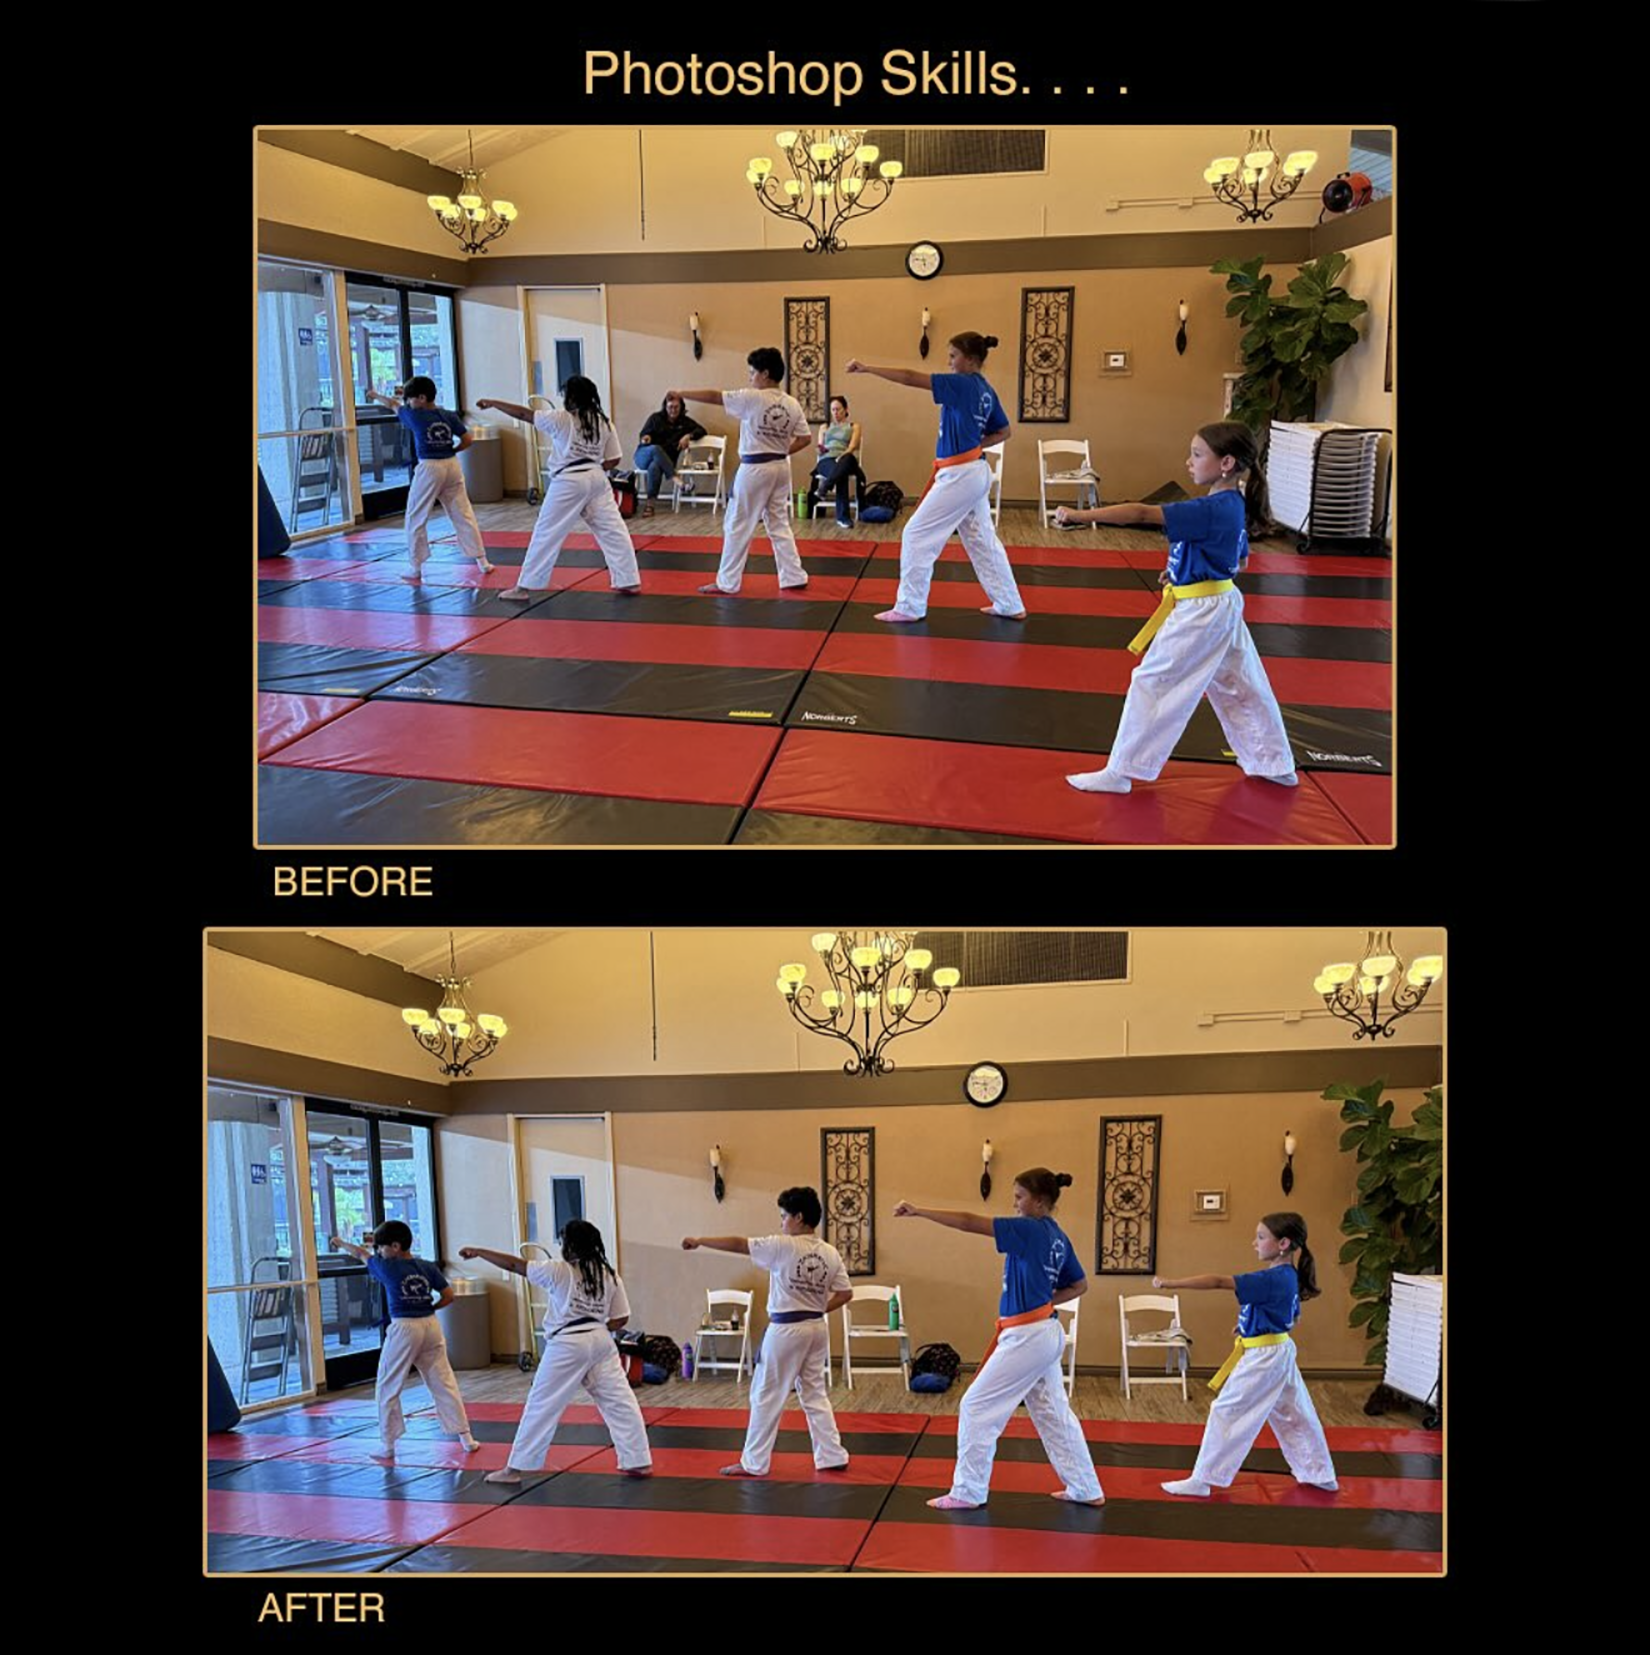
In this before photo, as you can see, one girl was not in line with the others, what a project to mover her! A combination of remove background tool (which also removes parts of the person, usually the parts of the hair) and the lasso tool to outline and delete background for missing parts by the remove background tool, then I isolated the girl from the background and moved her back in line, and sized her to fit. But I had to recreate the background she covered in the first photo with the plant and folding chairs on the right, and I had to remove the parents sitting in the back and recreate the chair parts covered by them when they were sitting. There’s no one tool yet that can do this with one quick touch of a button, it requires skill and attention to detail by an artist (me). It sure would have been simpler if our karate student was in line with the others in the first place! The fine art meets the martial arts once again!